Table of Contents
- Before you begin
- Phase 1: Test out HPOS on a local development system
- Review: Phase 1 Checklist
- Phase 2: Migrations and testing on a staging site
- Test out 3rd party and external systems
- Review: Phase 2 Checklist
- Phase 3: Enabling HPOS on production
- Enable synchronization, keeping posts authoritative
- Migrate and verify data
- Switch to HPOS as authoritative
- Switch off sync on the read
- Switch off sync on write
- Review: Phase 3 Checklist
- General guidelines
A large store's guide to enable HPOS on WooCommerce
大量のWooCommerceストアを運営していますか?HPOS (High Performance Order Storage) を有効にする作業に着手しようとしていますか?より多くの大容量ストアをHPOSに移行するため、このタスクに直面する可能性のある方々のためにガイドラインを文書化することにしました。
Before you begin
- Intro to High-Performance Order Storage
- High-Performance Order Storage Upgrade Recipe Book
- High-Performance Order Storage: Backward Compatibility and Synchronization
- Intro to High-Performance Order Storage for non-devs
Phase 1: Test out HPOS on a local development system
ローカルに開発用のセットアップがある場合は、開発用のセットアップでHPOSを試すことができます。このテストサイトでは、すべてのプラグインとカスタムコードが有効になっていること、そしてそれらの最新バージョンが動作していることを確認してください。テスト環境はできるだけ本番サイトを模倣してください。
少なくとも、以下のテストに集中することをお勧めする:
1.すべての支払い方法でチェックアウトをテストする。
2.チェックアウトの払い戻しをテストする。
3.WooCommerceサブスクリプションを使用している場合、サブスクリプションが購入でき、更新ができることを確認します。
4.あなたのサイトに定義した重要なフロー。
同期を有効にしても無効にしても、テストを繰り返すことができる。
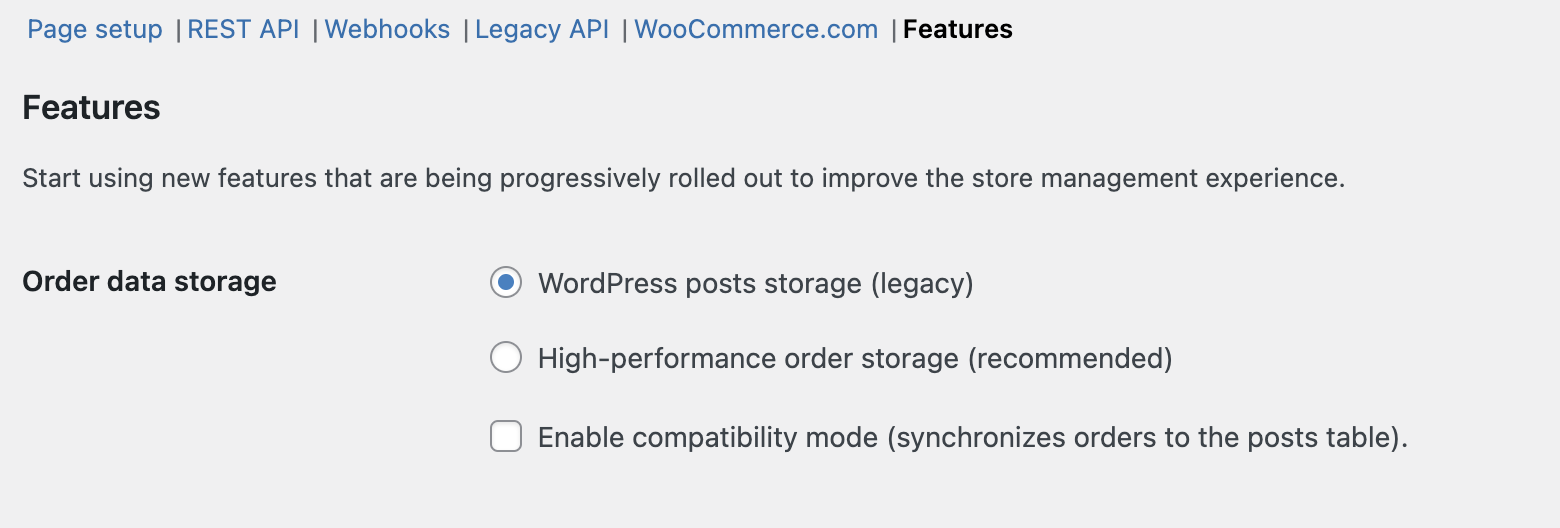
Remember that you can toggle synchronization by going to WooCommerce > Settings > Advanced > Features, and toggling the "Enable compatibility mode" checkbox.
Review: Phase 1 Checklist
- WooCommerce関連プラグインの最新バージョンをインストールし、テストサイトのコードが最新であることを確認してください。
- [すべての支払い方法についてチェックアウト機能をテストする。
- [テストチェックアウトの返金プロセスを確認します。
- [WooCommerce Subscriptionsがインストールされている場合、定期購入と更新をテストします。
- [同期の有効/無効の両方で重要なサイトフローをテストします。
Phase 2: Migrations and testing on a staging site
ローカル環境での動作に満足したら、本番データベースをステージング・サイトにコピーして、HPOSの移行をテストしましょう。大規模なサイトでは、同期をオンに設定することをお勧めしますが、スケジュールされたジョブに移行を依存する代わりに、CLIを使用することで作業をスピードアップできます:具体的には、wp wc hpos syncコマンドです。
最終的な(本番環境への)移行にどれくらいの時間がかかるかを知るには、このコマンドの実行にかかる時間を計ってください。例えば、900万件の注文があるテストストアの場合、完了までに約1週間かかりました。
For extra peace of mind, you can run wp wc hpos verify_cot_data --verbose to check that the data has migrated successfully.
Once migration is complete on your staging site, and still with synchronization enabled, re-run the tests defined in Phase 1. Disable the sync, and go through all testing again.
Test out 3rd party and external systems
PHP以外のシステムがDBに直接接続されていて、通常のコード監査から漏れている可能性があります。データウェアハウス、出荷追跡システム、会計システムなどのシステムがある場合、それらが直接投稿テーブルを読み取っていないか確認してください。もしそうであれば、次のステップに進む前に更新する必要があります。
Review: Phase 2 Checklist
- Make sure the code on your staging site is up to date by installing the latest versions of all WooCommerce-related plugins you're running.
- Migrate production database to staging site using CLI.
- Monitor migration time for insights into production migration duration.
- Test Phase 1 flows on the staging site with synchronization on.
- Optionally, verify data migration integrity using
wp wc hpos verify_cot_data --verbose. - Test Phase 1 flows on the staging site with synchronization off.
- Audit third-party systems to ensure they do not directly access posts tables.
Phase 3: Enabling HPOS on production
ローカル・セットアップとステージング・サイトでのテストに満足したら、本番環境でHPOSを有効にするための作業を開始しましょう。
Enable synchronization, keeping posts authoritative
前の段階と同様に、WordPressの投稿ストレージを注文ストレージとして使用しながら同期を有効にします。いつものように、WooCommerce > Settings > Advanced > Features に行き、Use the WordPress posts tables が注文データストレージとして選択されていることを確認してください。
これにより、HPOSテーブルにオーダーが表示されるようになり、既存のオーダーも最新の状態に保たれます。
Migrate and verify data
ここで、"互換モードを有効にする"チェックボックスをオンにして同期を有効にし、移行を開始する。
Right after enabling synchronization, you can start migrating past orders from the post tables to the new HPOS tables via CLI using the wp wc hpos sync command.
エラーが表示された場合は、同期をオフにするか、同期CLIジョブを中断すると安全です。エラーが解決すれば(あるいはエラーが同期処理と無関係なものであれば)再開できます。
Optionally, you can also run the verify command (wp wc hpos verify_cot_data --verbose) to check that data migrated is as expected.
重要:CLIジョブが完了しても、まだ同期をオフにしないでください。本番サイトでは、読み取り時に同期を無効にしてから同期を完全に無効にするというように、段階的に同期を無効にしていくことをお勧めします。
また、最近行った大量ストアの移行では、同期を有効(投稿はオーソリティ)にしたままでも、パフォーマンスに目立った悪影響は見られませんでした。
Switch to HPOS as authoritative
HPOSに切り替える時です。WooCommerce > Settings > Advanced > Features** に移動し、HPOSをオーソリティに設定します("Use the WooCommerce orders tables" を選択)。
前述したように、まだ同期をオフにしないでください。何らかの問題が発生した場合、システムは即座に投稿テーブルに戻すことができ、ダウンタイムは発生しません。
前のフェーズで作成したすべての重要なフローを再確認し、テストを実行してください。様々な支払い方法と重要なフローでチェックアウトをテストしてください。注文の多い店舗では、自然に注文が入ることもあるはずなので、それらの注文をいくつか開き、すべての注文データが期待通りに入力されていることを確認しましょう。サポートやコンタクトチャネルにも目を光らせておきましょう。
ヒント:もし、あなたのストアが自然にボリュームが少なくなる時期があるのであれば、その時に移行することをお勧めします。HPOSへの切り替えやポストへの復帰(必要な場合)はホットマイグレーションであり、計画的なダウンタイムは必要ありません。
Switch off sync on the read
ここまでのステップで、HPOSの同期を有効にしてきたが、次はHPOSの利点を最大限に活用するために、同期を徐々に無効にしていく。このプロセスの最初のステップは、読み込み時の同期を無効にすることである:
add_filter( 'woocommerce_hpos_enable_sync_on_read', '__return_false' );
より多くのリソースを必要とするため、まず読み込み時の同期を無効にします。もしあなたのサイトが期待通りに動いていて、注文がいくつか入ってくるのが見えたら、読み込み時の同期を無効にすることができます。私たちは、HPOSをオーソリティに設定してからわずか6時間後に、大量ストアの移行でこれを無効にしました。
Switch off sync on write
すべてが期待通りに動いているなら、書き込み時の同期も無効にできる。読み込み時の同期がすでに無効になっている場合、設定から同期を完全に無効にすることができます。いつものように、WooCommerce > Settings > Advanced > Features に行き、**"Enable compatibility mode "**のチェックを外してください。
On our high-volume site, we fully disabled sync after 1 week. We still run some manual synchronization (via wp wc hpos sync) periodically so that we have the opportunity to fall back to posts immediately should anything happen.
Keep in mind that disabling synchronization does not remove the ability to revert to the posts datastore, but you'd have to wait for the migration jobs to backfill the posts table with any data in the HPOS tables that they are missing. As always, wp wc hpos sync can also be used for this purpose.
同期を完全に無効にした状態で、様々な重要なフローをテストし、注文が期待通りに入ってきていることを確認し、サポートとコンタクトチャンネルに目を光らせてください。
Review: Phase 3 Checklist
- Plan to be online and monitoring your live site for a period of time.
- Enable synchronization with posts set as authoritative: in WooCommerce > Settings > Advanced > Features > select "Use the WordPress posts tables".
- Start migration via CLI using the
wp wc hpos synccommand. - Monitor for errors during migration; halt or resume as necessary.
- Verify migrated data integrity using the verify command
wp wc hpos verify_cot_data. - Enable synchronization with HPOS set as authoritative: in WooCommerce > Settings > Advanced > Features > select "Use the WooCommerce orders tables".
- Test all critical flows, perform checkouts with multiple payment methods, and verify order data accuracy.
- Monitor support tickets for any issues.
- Disable synchronization on read using the provided snippet:
add_filter( 'woocommerce_hpos_enable_sync_on_read', '__return_false' ); - Monitor site performance.
- After one week of stable operation, fully disable sync.
- Continuously monitor site performance, order processing, and support tickets.
General guidelines
1.[テスト環境をできるだけ本番環境に近づける。
2.[テスト中や移行中に発生した問題はすべて文書化する。
3.[テストの進捗と結果について、利害関係者と定期的にコミュニケーションをとる。
4.[問題が発生した場合に投稿に戻すことができるように、フォールバックシナリオの可能性を計画する。