Table of Contents
Customizing checkout fields using actions and filters
If you are unfamiliar with code and resolving potential conflicts, we have an extension that can help: WooCommerce Checkout Field Editor. Installing and activating this extension overrides any code below that you try to implement; and you cannot have custom checkout field code in your functions.php file when the extension is activated.
カスタムコードは、子テーマのfunctions.phpファイルにコピーしてください。
Note
チェックアウトブロックにフィールドを追加するには、追加チェックアウトフィールドのドキュメントを参照してください。
How Are Checkout Fields Loaded to WooCommerce?
The billing and shipping fields for checkout pull from the countries class class-wc-countries.php and the get_address_fields function. This allows WooCommerce to enable/disable fields based on the user's location.
これらのフィールドを返す前に、WooCommerceはフィールドを_filter_に通します。これにより、サードパーティのプラグインやテーマ、独自のカスタムコードで編集できるようになります。
Billing:
$address_fields = apply_filters( 'woocommerce_billing_fields', $address_fields );
Shipping:
$address_fields = apply_filters( 'woocommerce_shipping_fields', $address_fields );
The checkout class adds the loaded fields to its checkout_fields array, as well as adding a few other fields like "order notes".
$this->checkout_fields['billing']  = $woocommerce->countries->get_address_fields( $this->get_value( 'billing_country' ), 'billing_' );
$this->checkout_fields['shipping'] = $woocommerce->countries->get_address_fields( $this->get_value( 'shipping_country' ), 'shipping_' );
$this->checkout_fields['account']  = array(
    'account_username'   => array(
        'type'        => 'text',
        'label'       => __( 'Account username', 'woocommerce' ),
        'placeholder' => _x( 'Username', 'placeholder', 'woocommerce' ),
    ),
    'account_password'   => array(
        'type'        => 'password',
        'label'       => __( 'Account password', 'woocommerce' ),
        'placeholder' => _x( 'Password', 'placeholder', 'woocommerce' ),
        'class'       => array( 'form-row-first' )
    ),
    'account_password-2' => array(
        'type'        => 'password',
        'label'       => __( 'Account password', 'woocommerce' ),
        'placeholder' => _x( 'Password', 'placeholder', 'woocommerce' ),
        'class'       => array( 'form-row-last' ),
        'label_class' => array( 'hidden' )
    ),
);
$this->checkout_fields['order']   = array(
    'order_comments' => array(
        'type'        => 'textarea',
        'class'       => array( 'notes' ),
        'label'       => __( 'Order Notes', 'woocommerce' ),
        'placeholder' => _x( 'Notes about your order, e.g. special notes for delivery.', 'placeholder', 'woocommerce' )
    )
);
この配列もフィルターにかけられる:
$this->checkout_fields = apply_filters( 'woocommerce_checkout_fields', $this->checkout_fields );
つまり、あなたはチェックアウトのフィールドをフルコントロールできるのです。
Overriding Core Fields
Hooking into the woocommerce_checkout_fields filter lets you override any field. As an example, let's change the placeholder on the order_comments fields. Currently, it's set to:
_x( 'Notes about your order, e.g. special notes for delivery.', 'placeholder', 'woocommerce' );
テーマのfunctions.phpファイルに関数を追加することで、これを変更できる:
// Hook in
add_filter( 'woocommerce_checkout_fields' , 'custom_override_checkout_fields' );

// Our hooked in function - $fields is passed via the filter!
function custom_override_checkout_fields( $fields ) {
    $fields['order']['order_comments']['placeholder'] = 'My new placeholder';
    return $fields;
}
ラベルなど、他の部分をオーバーライドすることができる:
// Hook in
add_filter( 'woocommerce_checkout_fields' , 'custom_override_checkout_fields' );

// Our hooked in function - $fields is passed via the filter!
function custom_override_checkout_fields( $fields ) {
    $fields['order']['order_comments']['placeholder'] = 'My new placeholder';
    $fields['order']['order_comments']['label']       = 'My new label';
    return $fields;
}
またはフィールドを削除する:
// Hook in
add_filter( 'woocommerce_checkout_fields' , 'custom_override_checkout_fields' );

// Our hooked in function - $fields is passed via the filter!
function custom_override_checkout_fields( $fields ) {
    unset( $fields['order']['order_comments'] );

    return $fields;
}
Here's a full list of fields in the array passed to woocommerce_checkout_fields:
- Billing
billing_first_namebilling_last_namebilling_companybilling_address_1billing_address_2billing_citybilling_postcodebilling_countrybilling_statebilling_emailbilling_phone
- Shipping
shipping_first_nameshipping_last_nameshipping_companyshipping_address_1shipping_address_2shipping_cityshipping_postcodeshipping_countryshipping_state
- Account
account_usernameaccount_passwordaccount_password-2
- Order
order_comments
各フィールドはプロパティの配列を含む:
type– type of field (text, textarea, password, select)label– label for the input fieldplaceholder– placeholder for the inputclass– class for the inputrequired– true or false, whether or not the field is requireclear– true or false, applies a clear fix to the field/labellabel_class– class for the label elementoptions– for select boxes, array of options (key => value pairs)
In specific cases you need to use the woocommerce_default_address_fields filter. This filter is applied to all billing and shipping default fields:
countryfirst_namelast_namecompanyaddress_1address_2citystatepostcode
For example, to make the address_1 field optional:
// Hook in
add_filter( 'woocommerce_default_address_fields' , 'custom_override_default_address_fields' );

// Our hooked in function - $address_fields is passed via the filter!
function custom_override_default_address_fields( $address_fields ) {
    $address_fields['address_1']['required'] = false;

    return $address_fields;
}
Defining select options
select'タイプのフィールドを追加する場合、上記のようにキーと値のペアを定義します。例えば
$fields['billing']['your_field']['options'] = array(
    'option_1' => 'Option 1 text',
    'option_2' => 'Option 2 text'
);
Priority
PHPコードに関する優先順位は、関数と呼ばれるコードがページのロードに関連して実行されるタイミングを確立するのに役立ちます。これは各関数の内部で設定され、カスタム表示のために既存のコードを上書きするときに便利です。
つまり、優先度20のコードは優先度10のコードの後に実行される。
The priority argument is set during the add_action function, after you establish which hook you're connecting to and what the name of your custom function will be.
下の例では、青い文字が修正するフックの名前、緑の文字がカスタム関数の名前、赤が設定した優先順位です。

Examples
Change Return to Shop button redirect URL
In this example, the code is set to redirect the "Return to Shop" button found in the cart to a category that lists products for sale at http://example.url/category/specials/.
/**
 * Changes the redirect URL for the Return To Shop button in the cart.
 */
function wc_empty_cart_redirect_url() {
    return 'http://example.url/category/specials/';
}

add_filter( 'woocommerce_return_to_shop_redirect', 'wc_empty_cart_redirect_url', 10 );
優先順位が10に設定されていることがわかります。これはWooCommerceの関数とスクリプトの典型的なデフォルトなので、ボタンの機能を上書きするには十分ではないかもしれません。
その代わりに、優先順位を10以上の数字に変更することができる。11でもいいのだが、ベストプラクティスでは10刻みを使うことになっているので、20、30……といった具合だ。
/**
 * Changes the redirect URL for the Return To Shop button in the cart.
 */
function wc_empty_cart_redirect_url() {
    return 'http://example.com/category/specials/';
}

add_filter( 'woocommerce_return_to_shop_redirect', 'wc_empty_cart_redirect_url', 20 );
優先順位を使用すると、同じフックで動作する2つの関数を持つことができます。通常、これは様々な問題を引き起こしますが、一方が他方より優先順位が高いことを確認したので、当サイトは適切な関数のみをロードし、以下のコードで意図したとおりにスペシャルページに移動します。
/**
 * Changes the redirect URL for the Return To Shop button in the cart.
 * BECAUSE THIS FUNCTION HAS THE PRIORITY OF 20, IT WILL RUN AFTER THE FUNCTION BELOW (HIGHER NUMBERS RUN LATER)
 */
function wc_empty_cart_redirect_url() {
    return 'http://example.com/category/specials/';
}

add_filter( 'woocommerce_return_to_shop_redirect', 'wc_empty_cart_redirect_url', 20 );

/**
 * Changes the redirect URL for the Return To Shop button in the cart.
 * EVEN THOUGH THIS FUNCTION WOULD NORMALLY RUN LATER BECAUSE IT'S CODED AFTERWARDS, THE 10 PRIORITY IS LOWER THAN 20 ABOVE
 */
function wc_empty_cart_redirect_url() {
    return 'http://example.com/shop/';
}

add_filter( 'woocommerce_return_to_shop_redirect', 'wc_empty_cart_redirect_url', 10 );
Adding Custom Shipping And Billing Fields
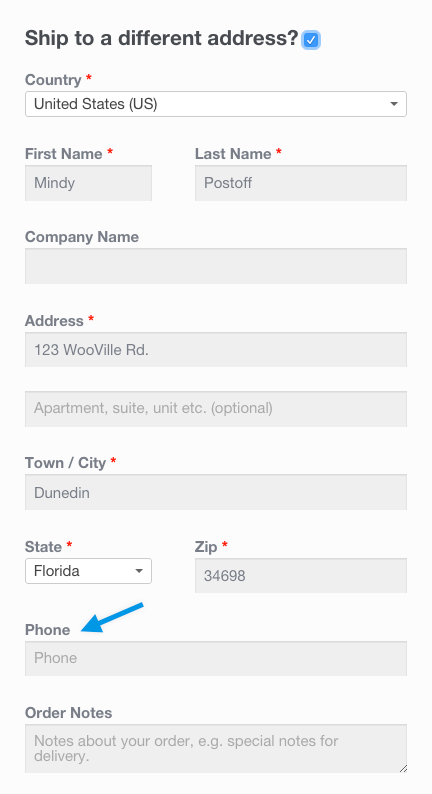
Adding fields is done in a similar way to overriding fields. For example, let's add a new field to shipping fields – shipping_phone:
// Hook in
add_filter( 'woocommerce_checkout_fields' , 'custom_override_checkout_fields' );

// Our hooked in function - $fields is passed via the filter!
function custom_override_checkout_fields( $fields ) {
     $fields['shipping']['shipping_phone'] = array(
        'label'       => __( 'Phone', 'woocommerce' ),
        'placeholder' => _x( 'Phone', 'placeholder', 'woocommerce' ),
        'required'    => false,
        'class'       => array( 'form-row-wide' ),
        'clear'       => true
     );

     return $fields;
}

/**
 * Display field value on the order edit page
 */
add_action( 'woocommerce_admin_order_data_after_shipping_address', 'my_custom_checkout_field_display_admin_order_meta', 10, 1 );

function my_custom_checkout_field_display_admin_order_meta($order){
    echo '<p><strong>'. esc_html__( 'Phone From Checkout Form' ) . ':</strong> ' . esc_html( $order->get_meta( '_shipping_phone', true ) ) . '</p>';
}
生きている!
What do we do with the new field? Nothing. Because we defined the field in the checkout_fields array, the field is automatically processed and saved to the order post meta (in this case, _shipping_phone). If you want to add validation rules, see the checkout class where there are additional hooks you can use.
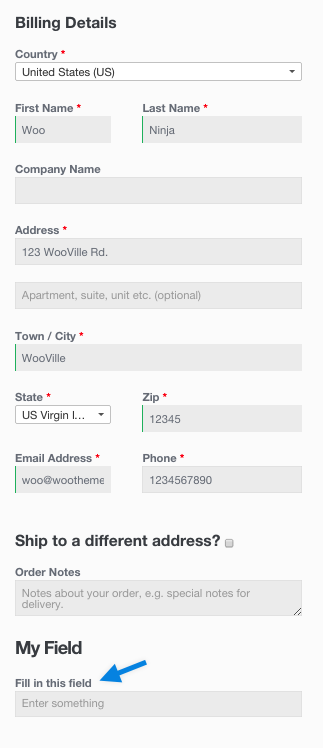
Adding a Custom Special Field
カスタムフィールドの追加も同様です。次のようにフックして、注文メモの後に新しいフィールドをチェックアウトに追加してみましょう:
/**
 * Add the field to the checkout
 */
add_action( 'woocommerce_after_order_notes', 'my_custom_checkout_field' );

function my_custom_checkout_field( $checkout ) {

    echo '<div id="my_custom_checkout_field"><h2>' . esc_html__( 'My Field' ) . '</h2>';

    woocommerce_form_field(
        'my_field_name',
        array(
            'type'        => 'text',
            'class'       => array( 'my-field-class form-row-wide' ),
            'label'       => __( 'Fill in this field' ),
            'placeholder' => __( 'Enter something' ),
        ),
        $checkout->get_value( 'my_field_name' )
    );

    echo '</div>';

}
これによって私たちは
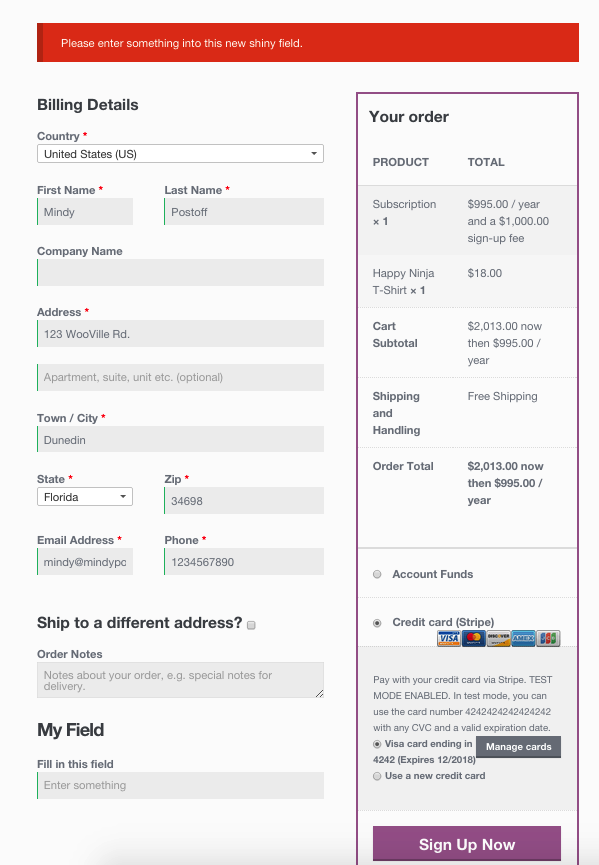
次に、チェックアウトフォームが投稿されたときにフィールドをバリデートする必要があります。この例では、フィールドに文字だけが含まれていることをチェックしましょう:
/**
 * Process the checkout
 */
add_action( 'woocommerce_checkout_process', 'my_custom_checkout_field_process' );

function my_custom_checkout_field_process() {
    // Check if this field contains just letters.
    if ( ! preg_match( '/^[a-zA-Z]+$/', $_POST['my_field_name'] ) ) {
        wc_add_notice( esc_html__( 'Please enter only letters into this new shiny field.' ), 'error' );
    }
}
フィールドが空白の場合、チェックアウトエラーが表示されます:
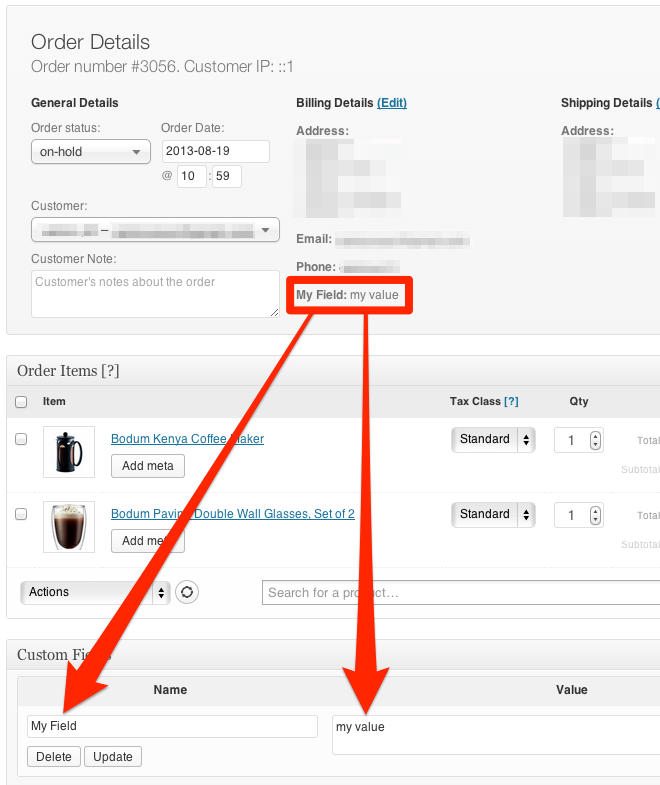
最後に、以下のコードを使って、新しいフィールドをカスタムフィールドの注文に保存しましょう:
/**
 * Update the order meta with field value
 */
add_action( 'woocommerce_checkout_update_order_meta', 'my_custom_checkout_field_update_order_meta' );

function my_custom_checkout_field_update_order_meta( $order_id ) {
    if ( ! empty( $_POST['my_field_name'] ) ) {
        $order = wc_get_order( $order_id );
        $order->update_meta_data( 'My Field', sanitize_text_field( $_POST['my_field_name'] ) );
        $order->save_meta_data();
    }
}
フィールドがオーダーに保存されました。
カスタムフィールドの値を管理画面の注文編集ページに表示したい場合は、以下のコードを追加してください:
/**
 * Display field value on the order edit page
 */
add_action( 'woocommerce_admin_order_data_after_billing_address', 'my_custom_checkout_field_display_admin_order_meta', 10, 1 );

function my_custom_checkout_field_display_admin_order_meta( $order ){
    echo '<p><strong>' . esc_html__( 'My Field' ) . ':</strong> ' . esc_html( $order->get_meta( 'My Field', true ) ) . '</p>';
}
これがその結果だ:
Make phone number not required
add_filter( 'woocommerce_billing_fields', 'wc_npr_filter_phone', 10, 1 );

function wc_npr_filter_phone( $address_fields ) {
    $address_fields['billing_phone']['required'] = false;
    return $address_fields;
}